816-724-1400


SNOWFIA GALAXY
1. Fade tool with light colors at the bottom left to dark colors on the top right. Airbrush a diagonal line across the middle with light colors. 2. Is the splatter tool at low opacity, 5%. Start with light colors on top of the diagonal. Then go to darker colors, placing medium, dark, and very dark splatter around light splatter. 3. Airbrush light colors on top making sure you can still see the splatter underneath. On the brightest spot of the galaxy use white or a very light color. 4. Add stars, use any tool you prefer to make small white dots throughout the page. Optional step you can add more light or dark in the corners of the page. Colors used various shades of blue.

SNOWFIA BLURRED LIGHTS
1. Pick 2 Colors and airbrush your canvas putting lighter color where you want the lights to be. 2. Use circle brush with white in various opacities. 3. Use darker shade of the two original colors add shadow with airbrush in the top left corner and in between the brighter circles. 4. Add highlights in white by using the bloom tool directly on top of the brightest circles to make them glow. Optional, you can go back with original colors and blend, using a low opacity airbrush. Some circles may have faded away feel free to add a few new ones.

RENATA_B LADY TUTORIAL
1. Choose base colors. 2. Create shadows using airbrush. 3. Create highlights using airbrush 4. Blend colors together. 5. Create texture on skin using pastel tool. 6. Create texture on dress using glitter brush.

CHERRY TUTORIAL
1. Draw basic shapes of cherries 2. Add texture To leaves and cherries 3. Add light to cherries. 4. Make a shiny highlight on cherries 5. Add a few more soft highlights to cherries 6. Add dark shadows on cherries 7. Add detail to leaves. 8. Don’t forget the drop shadow

EMMA.KATHERINE.ROSE
Excellent shiny metal tutorial.
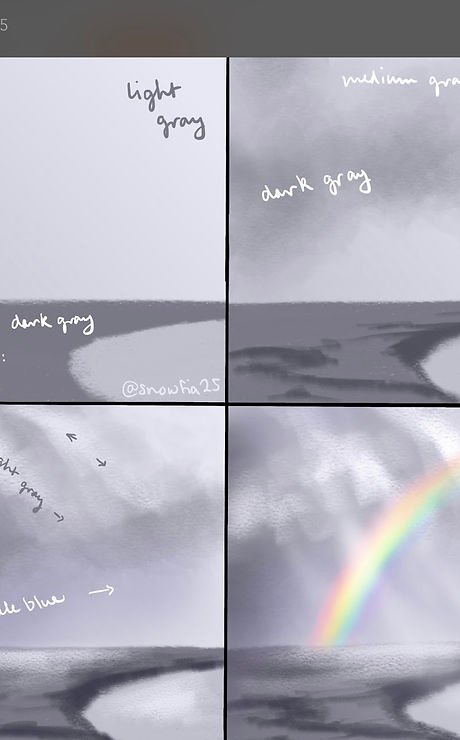
SNOWFIA RAINBOW SCENE TUTORIAL
1. Top right corner fade in light gray color bottom third with dark gray using 100% opacity pencil. 2. Use medium gray to draw in shape of lake in the corner. 3. Add dark gray clouds with watercolor brush using mid to low opacity large brush size. 4. Put medium gray clouds on top of this 5. Use very dark gray pencil brush to put shadows on the shoreline and cracks in the ground, keeping cracks mostly horizontal. 6. Use light gray pencil low opacity large size to draw additional clouds. 7. Low opacity airbrush darker gray on edge of the sky to obtain contrast. 8. Very pale blue airbrush across middle of the sky and lightly around the clouds. 9. Darken pencil shadows around cracks and shoreline. 10. Add highlights to clouds with white pencil. 11. Airbrush low opacity white diagonal lines across middle of sky. 12. Large size airbrush white on the right edge of sky. 13. Lastly add rainbow cautiously pick your colors do not recommend the rainbow palette instead use bright pastel colors using airbrush small size low opacity making sweeping arch design then blend colors as needed.

JOYCEAJL WATER DROPLET TUTORIAL
1. Choose background color. 2. Slide to darkest shade of background color to draw circles. 3. Slide color to left to lighten and draw inside circle edges user lighter shade each time. 3. Shade 1/2 way into circle being darker on one side 4. Slide color lighter than background on other side of circle add light highlights into dark portion. 5. Add a reflection with white in the dark portion. 6. Add a shadow on the less shaded edge, use white to add a highlight in the shadow.

EYE PUPILS


